A.D. Drumm Images, LLC – Landscape, Portrait, and Fine Art Photography in Rochester MN Photography

May 30, 2011

Using Zoomify

Filed under: General photography — Tony Drumm @ 10:07 am

I have an upcoming shoot where I’m hoping to be able to create an image made by merging several photos into one, similar to what’s done for a panorama. What I’m trying to do is produce a photograph with 50 or 60 effective megapixels (or maybe more).

I’m using words like hoping because there are some technical hurdles to be jumped for this particular shoot. I’ll write more about it once the shoot happens. Wish me luck.

Once this very large photo is created, I then want to be able to present it in a way that people can look at it closely. But I don’t want folks to have to download some enormous image file and then try to figure out how to view it. This is where Zoomify comes in.

Zoomify is designed specifically to do this. It uses Adobe Flash (sorry all you iPhone and iPad users!) as its interface. It generates a huges set of little JPEG files which it then uses to show image detail at the level the user selects.

I took the pano above at Yosemite in January using a vertical camera orientation and seven exposures. At 21MP each, that’s sort of a lot of data. I have a canvas print of this pano hanging in my office, and the detail is amazing. I thought this would make an interesting test for Zoomify. Happily, Zoomify comes with recent versions of Photoshop (it’s found on the File->Export menu). It’s incredibly easy to use and much faster than I thought it would be. It took much longer to upload all the files to my website than to generate them.

I’m pleased with the results. Inserting it into my post was pretty simple, too, just cutting/pasting a bit of HTML. Fingers crossed that I’ll have some good images from the shoot to play with. Watch this space!

May 23, 2011

Black Comedy

Filed under: Rochester Civic Theatre — Tony Drumm @ 7:19 pm

We shot the show photos for Black Comedy on Saturday. It was great to see the show a second time – we had attended opening night. It’s a farce, and it has every important element of a farce – most importantly, it’s very very funny!

Black Comedy uses an interesting concept – nearly all of the show takes place in the dark or near dark. To overcome this problem – how do you put on a play in the dark? – the lighting is reversed. When the characters are in the dark, the stage is fully lit. When they have light, the stage is dark. It’s quite a hoot to watch the actors seemingly stumbling in the “dark” when they are fully lit. But the audience also gains a new perspective, seeing facial reactions by characters who know the others can’t see them.

It’s tons of fun and was interesting to photograph. Greg, our esteemed director, once again uses everyone on stage and the entire stage to craft the show. So, there are quite a few longer shots to try to capture all that’s happening. The shot above is one for which I realized my house-center position was just losing its impact. Luckily, I realized this pretty quickly and had Ben and Christina position themselves a second time when I moved audience left to capture the perspective I wanted. Ben’s a trooper. He’s also rather bruised from the show! Did I mention all the physical comedy?

Photographically, this shot was one of my favorites. I did a bit of post work on it in Lightroom. There are a few shots that involved someone lighting a match or a lighter or a candle or a flashlight. In keeping with the mixed-up lighting theme, the lights dim when someone produces some lighting device.

I try to respect the stage by not overworking my shots. I want them to still provide the feel of a stage production, but sometimes I feel I can enhance reality a bit keeping the integrity of the shot while also adding a bit more emotion than what a straight-from-camera image would give. The theatre experience is more than just flat, two-dimensional images.

In this case, I darkened the background leaving highlights approximately where the match light would fall. But I didn’t try to go fully realistic. If I had, the background would have been reduced to black and there are some strong shadows from the overhead stage lights which would need to be addressed. But as it is, I think it looks good and produces the right reaction. And it looks like it might very well have looked like this on stage.

Some shots are just fun. They give us a taste of the show – it’s just wacky and a riot. This scene took place in the upstairs bedroom of the apartment. Time for a long lens and a bit longer exposure due to the reduced light up there. After shooting many shows, you learn that there are places on stage that have pretty hot light and others that tend to have much less, in general. There are exceptions and, of course, there are moodier lighting cues. But certainly center stage and down stage, though not right at the front, have the most light. As you move from there, the light drops off. Shooting manual mode, you need to adjust for this.

This was a shoot with a lot lower intensity than, say Beauty and the Beast. There’s only one box set, there are only a few props moving on and off stage and a minimum of costume changes. It’s a much smaller cast, and they are all very experienced. And they know the drill when Greg is setting up the shots and I’m shooting. The shoot went quickly.

The show runs one more weekend. It’s the sort of show where you leave your concerns and cares at the door and just laugh until it hurts. In short, it’s a great way to spend an evening!

May 20, 2011

Remembering: Match-needle metering

Filed under: General photography — Tony Drumm @ 5:36 pm

It was probably some time in the 1970s or so that camera makers began embedding an exposure meter in their cameras. Before that, you would use a handheld meter or just use your experience to tell you what settings to use. Before that, automatic exposure was not possible.

An aside… Exposure meters inside cameras are called reflective meters because they read the light reflected from the scene. The ideal meter is an incident meter that measures the light falling on your subject. An incident meter will read the same whether your subject is a groom in a black tuxedo or a bride dressed in white. Refective meters aren’t so lucky.

Anyway, I guess I’m happy to say the incorporation of the meters into the cameras predates my time shooting with SLRs. Sometimes I think I’ve been shooting for a long, long time! The first SLR I used, one I borrowed, had an exposure meter, although it had no auto exposure mode. On that camera, you rotated the aperture ring on the lens to select the aperture and rotated the shutter speed dial to select shutter speed. A little needle in the viewfinder would move up and down. There was a little plus sign and a little minus sign and between them was where the exposure was deemed to be correct.

A big problem with this setup was that as you rotated in smaller apertures, you had less light available to see what you were shooting and to focus. My first purchased SLR, the Canon AE-1 was more sophisticated. It would meter with the aperture wide open, then quickly stop it down to match the setting you dialed in as the shutter was fired. It also had an auto exposure mode, shutter-preferred, meaning you selected the shutter speed, turned the aperture ring to the A setting, for automatic, and the camera would select the aperture for you.

The meter in that camera looks something like the image above. It had a range of apertures listed and a single needle that showed what aperture would be used in auto mode or what aperture you should use if in manual mode. A big M would blink to warn you when you had the lens aperture ring set to something other than the A. It worked well enough. Later Canon models like the A-1 went to a fully digital display for the meter reading similar to what we have in our DSLRs today.

I grew to really like shooting in manual mode. Neither of these meter displays is really ideal for manual shooting. Another popular method was called match-needle. It’s what the image above is actually showing. The difference from the AE-1 display is that little circle. The circle is a needle as well. It’s tied to the aperture ring and moves up and down in concert with the aperture setting. Set the aperture to f/8, and the little circle would line up with the 8 on the meter. Then, you could adjust the speed until the needle was in the circle. In other words, until you have matched the needles!

What was nice is just how intuitive this is and how quickly you could make exposure adjustments without thinking about it. Need a bit more light, move the needle above the circle using the shutter speed, or drop the circle below the needle by turning the aperture ring. It’s hard to explain, but you could just glance at it while keeping your focus on the subject and composition. Or just sort of see it over there without really looking.

That is, you could concentrate on the image you were shooting. My F1 had this style of meter, and it’s actually one of the reasons I bought the F1. I liked shooting manual, and the F1 gave me what I felt was the best meter display for doing that.

But we’ve moved on. Today, following in the steps of cameras like the A1, we have tons of data in the viewfinder. More and more. There are icons for the flash, for other modes, for the ISO, for telling you when you’re late for dinner. I could say I find all of this distracting, but in truth, I find I don’t pay much attention to any of it. I look through the viewfinder and try to keep my attention on the composition.

Sometimes this bites me. I goof up the exposure in some obvious way. Or I do something that I know the viewfinder data was warning me not to do. Had I noticed. But in the end, I manage to create some decent photos. Everyone needs to find his or her own way around the camera, a method that’s comfortable and second nature. That seems to be what’s important.

May 7, 2011

Canon or Nikon. Discuss…

Filed under: General photography — Tony Drumm @ 8:23 pm

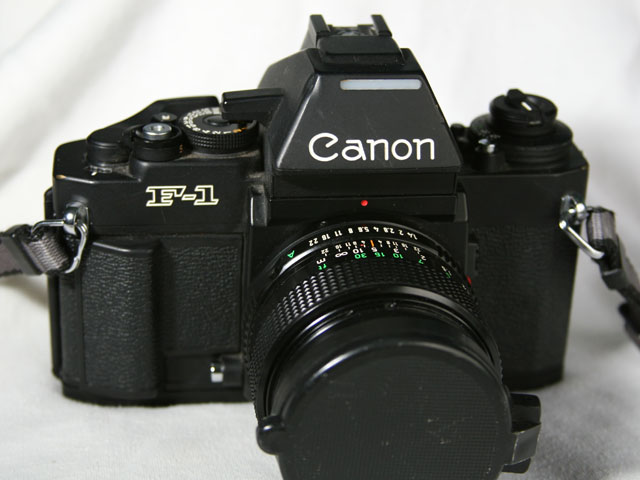
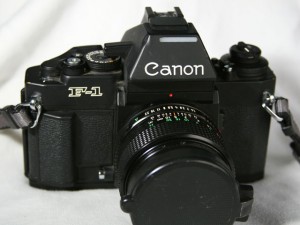
The "new" version Canon F1

I watched a podcast recently about some photography-related debate, and they mentioned the age-old Canon versus Nikon arguments we sometimes hear. Similar to the Mac versus PC, Coke versus Pepsi ad infinitum.

I tend to avoid these debates unless they’re becoming silly and fun (when the “debaters” all know there’s no one answer and are just joking around). But I know there are folks out there who want to know what to buy, which direction to go. I shoot Canon, and here’s why.

Back in a former life, I was a college student during the week and a skydiver on weekends. I drove 70 miles from Columbus to Xenia, Ohio every weekend to jump out of airplanes. The old adage goes, why would you jump out of perfectly good airplanes. The old answer was, you haven’t seen these airplanes! Exaggeration, but jump planes are a bit skimpy on amenities. Like seats and any instrument that might not be needed.

I had borrowed an SLR (can’t remember the brand, but it had screw-on lenses, called universal mount at the time, I believe). But I wanted to take freefall photos. You don’t just jump carrying a camera. It needs to be mounted usually to your helmet so you can aim with your head. A good friend of mine, Dick Boden, was an active, and very good photographer. He shot Olympus. He owned both the OM-1 and the then fairly new OM-2. Olympus was an innovator and made some incredibly small SLR cameras.

To shoot in freefall required a motor drive. This was a gizmo that attached to the camera and automatically advanced the film for you. They were available only for professional grade cameras, and they were expensive. But they could push film through at 5 frames per second or more. Remember, we’re talking film here. I think Dick could use his motor drive on either of his cameras.

Dick knew I wanted to shoot in freefall. One day he told me about this new camera. Canon was coming out with the AE-1, a reasonably priced SLR, for which they were going to be selling what they called a power winder. Not as fast as a motor drive, but hugely cheaper. Dick was an engineer, and he praised Canon’s cool use of metalized plastic to reduce weight and cost. The AE-1 had shutter-priority automatic exposure, and a ton of electronics which was very new at the time. Dick also praised Canon glass, their line of excellent lenses. It was a system one could grow into.

As I said, I was a college student. Even though I worked part time, the low entry price and the ability to do what I wanted to do won me over. I soon purchased one of the first AE-1s and a power winder. All that was left was to build a helmet mount for it and buy a very long remote release cord that could be threaded through a jumpsuit to my hand. The other thing the good freefall shooters used was a Newton sight. This let them actually aim the camera pretty well. Something else I couldn’t afford. I just aimed my head and hoped for the best.

As I graduated from college, moved into the next phase of my life, moved away from home, and stopped jumping, my AE-1 came with me and served me well. As my interest in photography grew, I eventually moved up to Canon’s “new” F1 – they developed a new version of their top-of-the-line camera but kept the name. In today’s lingo, they would have called it the F1 MkII. It was a great camera, and it was clear what differentiated “pro” gear from “consumer” gear. It was solid, heavy, and filled with features a pro would want. For instance, as Canon moved electronics into their line, the F1 could still shoot at 1/90 second with no battery. A pro needs to be able to get the shot.

I grew comfortable with Canon gear. Their lenses attach the right way. They feel good in my hands.

Photography took a back seat to other activities – like children – for a while. I was excited about the prospects of digital cameras, and Canon was there early. But the cost was prohibitive for me at the time. If I needed to shoot really good photos, I used my F1 and film. Again, Canon came through with the original Digital Rebel, the first DSLR under $1000. It gave me a chance to jump in to digital. Unfortunately, my lenses did not work on the Rebel. I never made the move to autofocus in the film era.

So, I could have switched systems when entering digital without affecting my previous investment. But I trusted Canon, and they again had the right product at the right time to pull me in. Nikon makes great gear, no question. But Canon had an affordable entry vehicle and Nikon, at that time, did not.

There you have it. I’m a Canon shooter and have been since 1976. Does Nikon have some technology I wish Canon had? Yes, especially in their speedlight system. It’s just a bit more nimble, although Canon now shows all the settings on the camera body in English which is a huge improvement. But photos are generally on par. And the real differentiator is the device we hold up behind the camera – the one with the eyeball looking into the viewfinder.

What about the other manufacturers? Minolta gave way to Sony, and Olympus is still with us. Both appear to produce good equipment. Neither has the depth of Canon and Nikon in terms of the range of lenses and the availability of full size (35mm film-size) sensors. They do bring some new, interesting features to the marketplace. In pro ranks, they are easily overshadowed by the two big names, and I think the huge systems behind the cameras are a factor.

If you’re buying a DSLR, what should you do? You probably won’t go wrong with any name-brand camera. And you have to ask yourself, “am I really going to buy more lenses or a separate flash?” If the answer is no, then try several cameras, read some reviews, feel how they fit in your hands. You’ll be fine. If the answer is yes, than Canon or Nikon may be the better fit. Find out what your friends are shooting. They can help answer questions, and you can share lenses.

I guess the important thing is to jump in. The water’s great here in the DSLR pool. It’s a joy to shoot with a great camera, and it can be a platform for learning and exploring your artistic side. If you let it.

Powered by WordPress